Saturday 27 March 2010

New Pictures

I know it's very late in me posting these but I thought i'd add some different shots of the lighthouse.


Tuesday 2 December 2008

Photoshop!

Here's a photograph of my lighthouse model that I have altered on photoshop. I'm experiementing at this point to see what works best and how I can put my lighthouse into a scene to make it look as realistic as possible.


Sunday 30 November 2008

Finito!

The project is officially over now and I've spent the past week since my last post putting the model all together and particularly working on the surrounding landscape and rocks of the baseboard. I used the plaster covered foam for big rocks and painted up gravel stones for medium sized rocks. The rest of the lanscape consists of sand and scenic scatter (that you can get from model shops) that I put on with PVA glue.

I intend to photoshop some of the photographs I have taken of it into an environment that will hopefully make my miniature look as realistic as possible.


Sunday 23 November 2008

Painting

Over the weekend I have been concentrating on painting the main outbuilding and lighthouse. I'm trying to achieve quite a weathered look to make the lighthouse look as authentic as possible. I sprayed the main white and red colour of the lighthouse with cellulose paint, as it is quicker than painting it by hand and I didn't want visible brush marks. To create the weathered stains and variations in colour I have been working with acrylic paint and chalks. I find that chalks allow me to create a more subtle shading difference than a paintbrush.


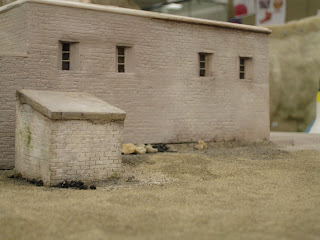
With the outbuilding I have painted it all by hand using acrylic paints. I first put on a basic base colour, then shade in darker areas, around edges and windows etc, and finish off by highlighting areas to pick up on the brickwork. I have tried to keep the brickwork quite subtle, as given the scale I don't want it to be too noticeable, unless you look at it more closely.


Wednesday 19 November 2008

Finishing up

Today I started adding the landscape to my baseboard. I've used sand glued on with PVA and added a few of the coastal rocks. I still need to make a lot more rocks, which I plan to work on tomorrow. I'm using real gravel stones to create medium size rocks, which I'll paint up to fit the colour scheme. I've also been working on painting the front of the main outbuilding.


Thursday 13 November 2008

Update

Upto this point I've mainly been working on the main outbuilding of my model. I cut out the walls first in MDF and cast panels of brickwork in fast cast which I stuck on top.


I've also added the windows to my lighthouse and finished the railings on the top balcony.


I've sprayed the baseboard with a sandy colour speckle so that when I come to add sand to it will hopefully blend better with the base.


Sunday 9 November 2008

Making Railings

Today I've been working on the railings at the top balcony section of the lighthouse. I had previously lathed a piece of chemi-wood into the shape of the balcony and now I'm finishing this particular top section off by using wire to create the railings. Once this section is completed it'll be ready for spraying. I have decided to use a spray gun to colour any sections of the lighthouse that are in red so that I can get in between the railings more easily and I won't have a problem with having to keep remixing paint. I'm also deciding to do it with a spray finish as this part of the lighthouse doesn't have texture and I do not want to leave visible brush strokes.


Thursday 6 November 2008

Back on Track

Today I finished creating the brickwork effect on my lighthouse. Unfortunately as I lost a week out from being ill on this project I am not going to have the time to mould and cast my lighthouse so I will be using the MDF master. This will add quite a bit of weight to the baseboard so for practical reasons I'm going to hopefully leave the lighthouse so that it is detatchable from the base. I have also had to dremel out spaces for the window. As the windows are going to be butted up against solid MDF I'm going to have to back spray the window panes.


Despite losing a week of the making process last week I've felt on track up until that point I took time off and taking the moulding and casting of the lighthouse out of the equation hopefully means that if I continue to work steadily as I have done I'll still make the deadline for this project.

Tuesday 4 November 2008

Bricking the Lighthouse

Today I made the brickwork pattern on my lighthouse. I did this by first carving a brickwork pattern the size I needed into carbody filler . I then made a texture mat of this carving by covering it with silicone. I then covered a section of the MDF cone shape that I lathed out in car body filler and wrapped the silicone mat around it to transfer the brick pattern. I think the result is quite effective, the end result looks like weathered rendering that has worn away in places to reveal the brick underneath it. However it was quite problematic holding the silicone mat in place, as I had to wait for the car body filler to set before I could peel it away.

Contours Continued...

Today I cut out my contours and stuck them down. Unlike I previously suggested in my last post about cutting out a space for the buildings to slot into, I decided against this idea as it would have taken me quite a bit longer to cut out a shape in every contour to create the insert. To finish off I need to cover the contours with car body filler and do a lot of sanding to smooth them off!

Wednesday 29 October 2008

Contours

One of the other next big steps I need to take with my model is landscaping the baseboard to create the gradients of the ground. The land the lighthouse would have been built on was along a beach so the ground will be relatively flat however all the buildings sit at slightly different heights. I'm going to make the contours leaving room for an insert, where I can sit the buildings into the countours. This will allow me to work on both the landscape and building separately, whilst making my model more stable.

I plan to build the contours up using foam board, which will be lighter than wood. I'll then smooth then over with car body filler.

Sunday 26 October 2008

Half Way Point Update

At this point I have five weeks left until my project deadline. Unfortunately for the last couple of days there has been a bit of a lul in proceedings as I have been unwell. Up to this point however and since my last post I have started constructing the outbuilding, finished off my lathing work of the top components of the lighthouse and I have also started creating the brickwork pattern to be used on the lighthouse itself.
  • Outbuilding: I have decided to make this out of thin MDF and clad it with resin casts of the brickwork pattern I moulded in silicone. I'm cutting out the required shapes of the windows and door and will slot these into place last.
  • Lathing top features of Lighthouse: I lathed the dome at the top and the balcony of the lighthouse in grey chemi-wood. It's actually been my first time working in chemiwood and it was a nice material to use on the lathe and can be finished to a quite high standard. NOTE: When sticking pieces of chemi-wood together to use on the lathe DO NOT use pva glue use superglue.
  • Lighthouse Brickwork pattern: For the main body of the lighthouse I want to show the texture of brickwork. I don't want the pattern to look too obvious so I'll try some samples of rendering over the top of it. To transfer a brick pattern onto the MDF cone I have so far, I'm sculpting it flat into carbody filler and moulding it in silicone. I'll then use the silicone as a texture mat to imprint the pattern into a thin layer of car body filler that I'll cover the cone in. Once I have this imprint I can get on and make a fibreglass mould of the lighthouse, which is the next big step I need to take on the project.

Thursday 16 October 2008

Bringing the lighthouse to life


Today I finished making the basic cone structure of my lighthouse. I started off by cutting uniform square blocks of MDF and drilling a hole in the centre point of each one. I then glued and clamped them all together along a piece of wooden dowel that ran through the central holes I had drilled. From their I turned the wood on the lathe at a 3 degree angle to create the tapered shape of the lighthouse. From this shape I'll probably make a two part mould in fibreglass so I can cast from it a shell of the lighthouse.

Tuesday 14 October 2008

Bricking It

Today I've been working on creating a sample for the brickwork of the outbuilding of my model. I need to make the surface look quite aged and weathered. I have so far experimented with covering wood with car body filler and then scoring the brickwork pattern into it. I think the result of this is effective however it is a time consuming process. I would like to try experimenting with a few other techniques. I might attempt laser cutting the brickwork pattern into acrylic and using filler to give it the texture of brick.


Cut out the problem of this method being too time consuming by making a silicone mould of the master, which picks up the small detail well. I have since experimented casting this panels of brick in fast cast and car body filler slush. Both work well however the fast cast is quicker to mix up and doesn't take as long to set, therefore I think this is the best method to use. I've tried pigmenting the fast cast in different colours so I have a base colour to begin with, however unless I can replicate the colour well enough there may be continuity issues. Over the top of the brick I'm dry brushing with acrylic paint to try and create the weathered look I need. NOTE: Try not to make the brick colour too intense, remember lighthouse tower is lighter in colour.


Thursday 9 October 2008

Rocking Samples

This week I have been experimenting with trying to create coastal rocks. The method I have used so far is by hotwiring the shape of the rock from blue foam and then with my fingernails digging out random pits in it. I then covered the foam in a layer of PVA glue to seal it and used plaster to cover it over. Once the plaster had nearly set I tried out different ways of creating surface texture. These included using a stipling motion with a hard bristle paint brush and dabbing over the plaster with my fingers. I then painted them up with different layers of paint.
I am fairly pleased with the results so far, however I need to spend more time on them and make more samples to ensure they look authentic on the model.
Need to carry out further research into the geology and types of rock of the region I'm looking at to give me a reference point.
http://www.jsce.or.jp/committee/2004sumatra/chapter_3.pdf (Indonesian Geology)
http://www.ucmp.berkeley.edu/tertiary/pli/bodjong.html (Geology of Western Java)

The type of rock making up West Java region is Quaternary Volcanic rock, similar to the types from the links below.
http://k41.pbase.com/g3/57/395157/2/67059786.j975OvXe.jpg

Proposed Making Method

I plan to construct the shape of the lighthouse tower using a block of MDF that I'll turn on the wood lathe. As of yet I'm unsure what steps to take after that, however I may from the MDF structure create a two part mould in fibreglass and later cast the tower from that again in fibreglass, which is lightweight and durable.

Tuesday 7 October 2008

Mocking Up

I have decided to create my model lighthouse at a scale of 1:50, making the lighthouse tower itself approximately 50cm in height. I would have liked to make it at a larger size however making it at 1:50 should give me the opportunity to finish the model to a better standard. Below is the sketch model I've mocked up in cardboard at my decided scale.


As specified by my client hyperthetically my model would be filmed from a frontal angle. Ideally, as in industry I would build out the baseboard a lot more around the front and left hand side of the model to create good depth of field for the camera. However for practical reasons my baseboard will be a more managable size, but I will include some of the surrounding coastal rock.